If your business has predictable compute workloads and wants to save on Azure spend, Azure Reserved Instances can make you the FinOps department’s new favorite person. But we’re getting ahead of ourselves. Before we tell you how you can start saving on your cloud spend, let’s define a few terms.
Table of Contents
What are Azure Reservations?
Azure Reservations, like Azure Savings Plans, are Azure pricing plans that offer you discounts in return for your commitment to a certain service for one or three years. You can pay for the reservations either upfront or every month. The good news is there aren’t any drawbacks to monthly payments – just keep in mind that the monthly payment option is only available for Azure products, not third-party products.
In other words, if you’re operating with a consistent workload, Azure Reservations are a pricing hack to help you save up to 72% on costs… for the most part.
To examine the fine print, we first need to divide Azure Reservations into two categories: Reserved Instances for only Azure VMs, and Reserved Capacity, a pricing option for Azure storage, data services, and apps.
Reserved Instances
Azure Reserved Instances enables you to reserve a subset of VMs for either a one- or three-year period. By prepaying for that Azure virtual machine commitment, you can save up to 72% on costs. It’s important to remember, though, that this discount only applies to your VM costs. You won’t be getting any cuts for your installed software, storage, or networking costs.
Reserved Instances requirements
The good news?
You can apply Reserved Instance pricing to your Linux or Windows Azure VMs. If you’re working with Windows VMs, you can save up to 80% in comparison with Pay-as-You-Go prices. If you’re using Linux VMs, you can save up to 72%.
The bad news?
Not all VMs are eligible for this discount. Those from the A-series, Av2-series, and G-series are excluded, as are promotional VMs or images in preview. Make sure to be careful when you review your eligibility! Visit the Azure site for more info.
Reserved Capacity
Reserved Capacity also offers discounts if you commit to services for a one or three year period, same as Reserved Instances. The two differ in that Reserved Instances covers everything but Azure VMs, like Azure Disk Storage, SQL Database, and more (don’t worry, we’ll explain this in complete detail below!).
Depending on the service you commit to, you can save up to 65%.
But tread carefully—depending on what is excluded from the deal, you may still have to pay full price for storage, networking, or software.
Here’s what’s included and excluded for each resource for Reserved Capacity:
| Resource Type | One Year Commitment | Three Year Commitment |
| Reserved Virtual Machine Instance | Savings up to 32% | Savings up to 72% |
| SQL Database reserved vCore | Savings up to 21% | Savings up to 33% |
| Azure Disk Storage reservations | Savings up to 5% | Not included in offer |
| Azure Synapse Analytics | Savings up to 37% | Savings up to 65% |
| Azure Database for MySQL | Savings up to 42% | Savings up to 61% |
| Azure Database for PostgreSQL | Savings up to 39% | Savings up to 59% |
| Azure Database for MariaDB | Savings up to 42% | Savings up to 61% |
| Azure Databricks | Savings up to 39% | Savings up to 61% |
| Azure Cache for Redis | Savings up to 33% | Savings up to 65% |
| Azure App Service Premium V3 | Savings up to 25% | Savings up to 40% |
| Azure App Service Isolated | Not included in offer | Savings up to 40% |
Reserved Capacity requirements
To qualify for Reserved Capacity, you’ll need a minimum of 8vCores of SQL database or 20,000 RUs (Request Units) for Azure Cosmos DB. If you’re looking for App Services discounts, you must use Premium V3 and Isolated tiers.
How do Azure Reserved Instances work?
The biggest thing you should remember about Azure Reservations is that it operates on a “use it or lose it” system. If you aren’t matching the hour-by-hour reservation you made for your resource, that’s money lost. In other words, unused reservation time will not be carried over.
On the other hand, if you exceed your reserved level, you’ll be charged pay-as-you-go rates for however much you exceed your agreed-upon amount.
The diagram below illustrates how this works:
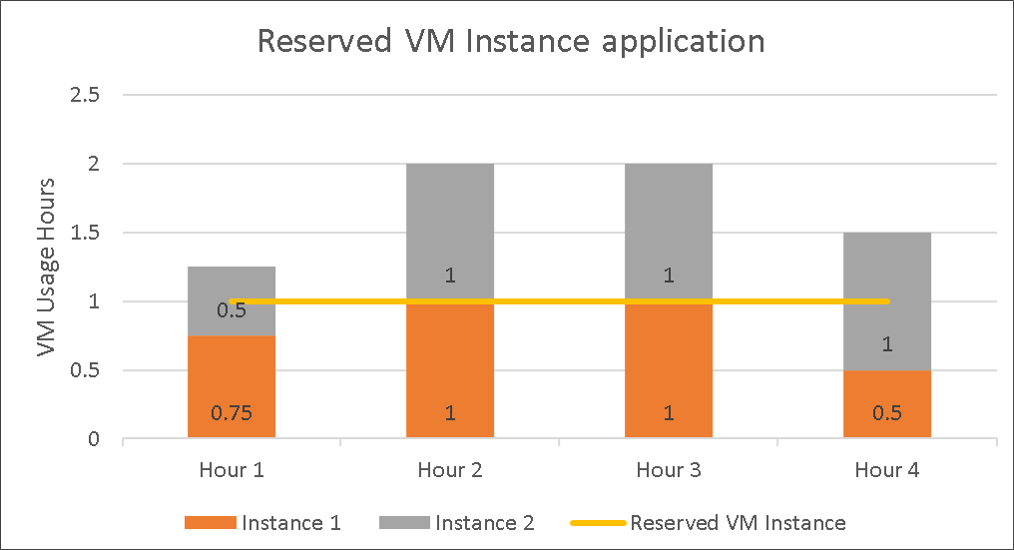
Source: Microsoft
If you need to shut down your resources, Azure will automatically try to apply your reservation discount to another resource that matches your agreed-upon scope. If no other resources match that scope, the reservations will remain unused. Luckily, you can always update your reservation scope even after buying it, so you can adjust things as needed.
Another insider tip: if you have VMs in a different subscription assigned to your account, you can make that scope “shared”, which tells the system to apply the reservation discount across all account subscriptions.
Best resources for Azure Reservations
Accurately estimating the resources you’ll use per reservation is the key to Azure Reservations savings. This is because all reservations but for Azure Databricks are applied hourly, and if you use less than your reservation amount, those resources you’ve paid for go unused. In other words – money wasted.
Let’s use VM Reserved Instances for an example. You’ll want to be certain of your VM size before purchasing because you can’t update the size during the reservation period. There’s an easy way to review your historical VM usage to decide on the best Azure Reservation for your organization. You can do this by:
- Go to the Azure portal.
- Search for and click on Subscriptions.
- Select Billing → Invoices.
- Use your most recent invoice or the invoice that best represents an average period of VM usage.
- Select Download csv (located under Usage Details).
The file should look something like this:

Source: Microsoft
Use this data over multiple periods to calculate your average VM usage. Make sure to consider positive or negative growth for your company as well.
Remember that though VMs aren’t used 24/7, you might still want to switch to reserved instances, especially based on break-even analysis when you compare those pay-on-demand numbers to reserved instance costs.
Use Azure resources or third-party resources like these to project best how much hourly reservation you need so you won’t end up overspending on tools you don’t use.
Purchase recommendations
You can don’t need to worry about planning your Azure Reservations approach – Azure will deliver you automated reservation recommendations once you get started. Using data based on your hourly usage over 7, 30, and 60 days, Azure calculates your reservations compared to the pay-as-you-go cost you would have incurred and recommends what quantity you should use to maximize your savings.
You typically use 1,000 VMs for all your workloads, though this need sometimes exceeds 1,500. Azure’s calculations will then include estimates of 1,000 to 1,500 VMs. Though if the demand for 1,500 VMs is very infrequent, the calculations might be for only 1,000 VMs.
Important things to remember when you receive your purchase recommendations for VMs:
- These recommendations are based on individual VM sizes, not the entire size family.
- After you commit to a reservation amount, the recommended quantity of scope is reduced that same day. This is because the reserved VMs are now excluded from the resources you can access Azure Reservations.
How to purchase your first Azure Reservation
If you feel based on the information we’ve provided above that Azure Reservations are a good fit for you, here’s how you can go about getting your discounts: Step 1: Determine who can purchase the reservations
Before you start purchasing, you’ll need to make sure that you’re either the Azure subscription owner or that you have access to a reservation purchaser role, like the Enterprise Agreement or Microsoft Customer Agreement billing admin roles.
Pro tip: Enterprise Agreements, Microsoft Customer Agreement Subscriptions, and Pay-As-You-Go Subscriptions are the only roles that support reservations.
Step 2: Determine which scope you should buy
Now that you’ve confirmed who can purchase your reservations, you’ll next want to determine your reservation scope.
There are three reservation scope options:
- Single resource group scope. This option applies the reservation discount only to matching resources in a certain Azure resource group.
- Single subscription scope. This option applies the reservation discount to all matching resources in your Azure subscription.
- Shared scope. This option means you can apply your discounts to all matching resources used by any subscriptions paid for by the same billing source. For instance, your billing scope would be enrollment if you have an Enterprise Agreement Azure Subscription. In contrast, if you had Pay-As-You-Go individual subscriptions, your billing scope would be all eligible subscriptions.
Step 3: Determine which service you wish to buy reservations for
You’ll receive a different percentage discount depending on your chosen service. To get an idea of how much you can save depending on your service of choice, review your options below:
| Resource Type | One Year Commitment | Three Year Commitment |
| Reserved Virtual Machine Instance | Savings up to 32% | Savings up to 72% |
| SQL Database reserved vCore | Savings up to 21% | Savings up to 33% |
| Azure Disk Storage reservations | Savings up to 5% | Not included in offer |
| Azure Synapse Analytics | Savings up to 37% | Savings up to 65% |
| Azure Database for MySQL | Savings up to 42% | Savings up to 61% |
| Azure Database for PostgreSQL | Savings up to 39% | Savings up to 59% |
| Azure Database for MariaDB | Savings up to 42% | Savings up to 61% |
| Azure Databricks | Savings up to 39% | Savings up to 61% |
| Azure Cache for Redis | Savings up to 33% | Savings up to 65% |
| Azure App Service Premium V3 | Savings up to 25% | Savings up to 40% |
| Azure App Service Isolated | Not included in offer | Savings up to 40% |
Remember, reservation hours cannot be carried forward or accumulated. These are use it or lose it savings. Budget and forecast with care.
Step 4: Make your purchase
You know you have the authority to make your purchase, you’ve selected what you want to buy – now you only need to pull the trigger. You can do that by:
- Log into your Azure Portal account.
- Navigate to All Services → Reservations.
- Select Add from the top menu bar to buy your new reservations.
- Select your chosen product using the “Select the product you want to purchase” pane.
- Add your product to the cart. Review one last time and make your purchase!
Worried you’re in the wrong place? This is what you should see on step 4:

Source: Microsoft

Limor Tepper
Head of Product, Anodot
Limor leverages her expertise in product management and telecom to drive product innovation and development.
TIPS FROM THE EXPERT
- Leverage auto-scaling for cost-efficiency
Implement auto-scaling in your Azure environment to match workloads with reserved instances. This ensures that you maximize the usage of your reserved instances during peak times and scale down to avoid unnecessary costs during off-peak periods.
- Utilize Azure Hybrid Benefit
If you have on-premises licenses covered by Software Assurance, use Azure Hybrid Benefit in combination with Reserved Instances. This can further reduce costs by allowing you to apply existing licenses to Azure VMs.
- Plan for future growth
Factor in expected growth when purchasing reservations. While undercommitting might seem safer, it can lead to higher costs if your resource needs grow faster than anticipated. Conversely, overcommitting can lead to unused resources.
- Use cost management tools
Utilize tools like Anodot to track and manage your Azure Reserved Instance spending. These tools provide detailed insights into utilization, helping you identify opportunities for cost savings and avoid overspending.
- Evaluate reserved capacity for non-VM services
Don’t overlook the potential savings with reserved capacity for non-VM services like Azure SQL Database or Azure Synapse Analytics. These can provide significant discounts if your workloads are stable and predictable.
Azure Reservations combined with Azure Hybrid Use Benefit
There’s actually a hack where you can combine Azure Reservations with another discount plan called Azure Hybrid Use Benefit. You’ll need to make sure you’re already a Microsoft Enterprise Agreement customer and that you’re using Software Assurance.
If you check those boxes, you can stack Azure Hybrid Use Benefit (HUB) discounts with Azure Reservation discounts.
Combining these two can help you save up to 80% if you agree to a three-year reservation.
Get 100% visibility into your Azure Reservation Instances spend
Azure Reservations, Azure Savings Plans, and Azure Hybrid User Benefits aren’t the only way to save on your Azure spending. You can save up to 40% by improving your visibility into how much you’re paying in Azure Reservation Instances costs with Anodot.
Anodot’s cloud cost management tools mean you can get detail on your Reserved Instance (RI) Utilization in one page, with details on your purchased RIs and utilization data on current and future reservations. You can get budget projections and data retention periods from 18 to 24 months that show granular hourly changes.
So when we say 100% visibility into your Azure spend, we mean 100% visibility into your Azure spend. We help you make sure that every penny is putting in work!
Above is an example of what one of our RI-specific dashboards looks like to ensure 100% utilize for your Azure RIs.
Anodot has a Commitment Dashboard which displays all you need to know about your Azure spend, breaking down On demand, Spot, and Savings plans in addition to RIs – all in one place.
Anodot’s dashboards are designed to educate you on how much your spending, how much yoru saving, and, most importantly, how much you’re missing out on. So if you’re worried that you might not be as saving as much as you should with Azure Reserved Instances, our dashboards can help you calculate those exact numbers and configure a strategy to help you save more.
Why Anodot? Demystifying cloud costs for FinOps organizations is what we do. With our real-time anomaly detection and customizable alerts, you never need to worry about overspending. Optimize your budget with AI-powered feedback and don’t worry about even having to lift a finger.
Want a proof of concept? Talk to us to learn how much you can save with Anodot’s tools.
Written by David Drai
You'll believe it when you see it